
5 Unique Ideas for Enhancing Stereo Image
Add stereo width and interest to your signal with these five handy techniques using a range of audio processors
No matter how many multichannel technologies come along, the default way to listen to music – and the default way to produce it – remains the same: across two channels, left and right.
That’s not to say that producers haven’t pushed the boundaries within those two speakers over the decades. Long gone are the days of taking a mono sound and placing it on the extreme left, the extreme right, or the center. Today’s modern mixes often call for something more advanced: precise control over every sound’s stereo image.
In this article, we’ll investigate some unconventional methods of magnifying your stereo image to bring your mix to life, competing with today’s hard-hitting and wide mixes, without upsetting your all-important mono compatibility.
Subscribe to our newsletter to get more production insights like these in your inbox!
In This Article:
- Detuned Haas Effect with H910 Dual Harmonizer®
- Mic Positioning and Panning with Tverb
- Panning Transient and Tonal in SplitEQ
- Micro Pitch Shift with UltraChannel
- Hard Panning Different Reverbs
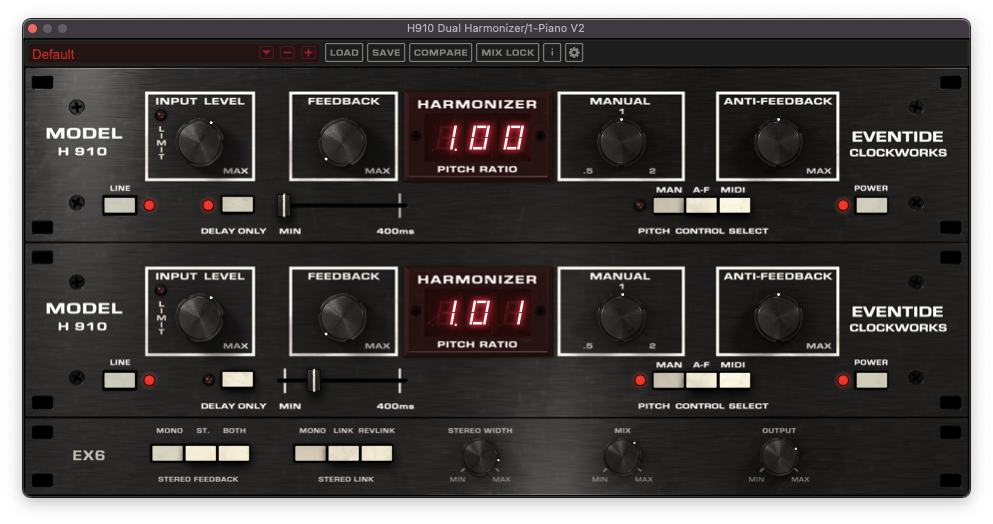
1. Detuned Haas Effect with H910 Dual Harmonizer
We’ll start with a twist on a stereo widening effect that you might be familiar with, the Haas effect. Unearthed by Dr. Helmut Haas in the mid-20th Century, the Haas effect has become a simple go-to stereo widening trick that can be achieved with just about any delay.
The technique is a psychoacoustic phenomenon based on offsetting the timing between the left and right channel, and we can use it to give the perception of a signal being wider than it is. But what happens if you subtly offset the tuning between the left and right channel, too?
The H910 Dual Harmonizer allows us to apply independent delay and pitch adjustment to the left and right channels. Let’s start by applying a simple Haas effect to a piano by setting the left channel to Delay Only and reducing the delay time to 0ms.

We can then set the right channel’s delay time to somewhere between 20ms to 50ms as above, depending on the source sound and how extreme you want the effect to be. For example, transient sound sources should have shorter delay times to prevent unwanted flamming, while you can get away with applying longer delay times to sustained tones. You should now have a nice Haas effect, and a wider signal than you did originally.
Now, ever so slightly adjust the right channel’s pitch ratio up or down using the Manual knob. We’re talking a really small amount here, otherwise the effect can quickly become dissonant. The resulting effect sits somewhere between a Haas and a chorus.

For a less extreme effect, try reducing the Stereo Width to bring the left and right channels closer to the center of the mix, or turn the Mix amount down to reintroduce some of the dry signal.
2. Mic Positioning and Panning with Tverb
This next technique won’t be particularly groundbreaking to those of us with experience tracking live instruments in a professional recording studio. For many of us though, that’s not been a part of our music making journey just yet.
Thankfully, Tverb bridges the gap between your keyboard and mouse, and the infamous Meistersaal concert hall at Berlin’s Hansa Tonstudio, offering us a wealth of in-depth control over a simulated recording scenario. With one fixed mic and two more with independent positioning, level and panning, there’s a huge amount of scope to improve the stereo image of your signal.
In this case, we’re going to be applying reverb to our drums via an aux or return channel, giving us maximum control and allowing us to blend the wet stereo signal in with the dry mono signal. First of all, start by panning Mics two and three hard left and right, then reducing the level of Mic one. This emphasizes the sides of the signal, resulting in a wider reverb. We’ve also dialed back the decay time, as we’re going for a subtle reverb effect here.
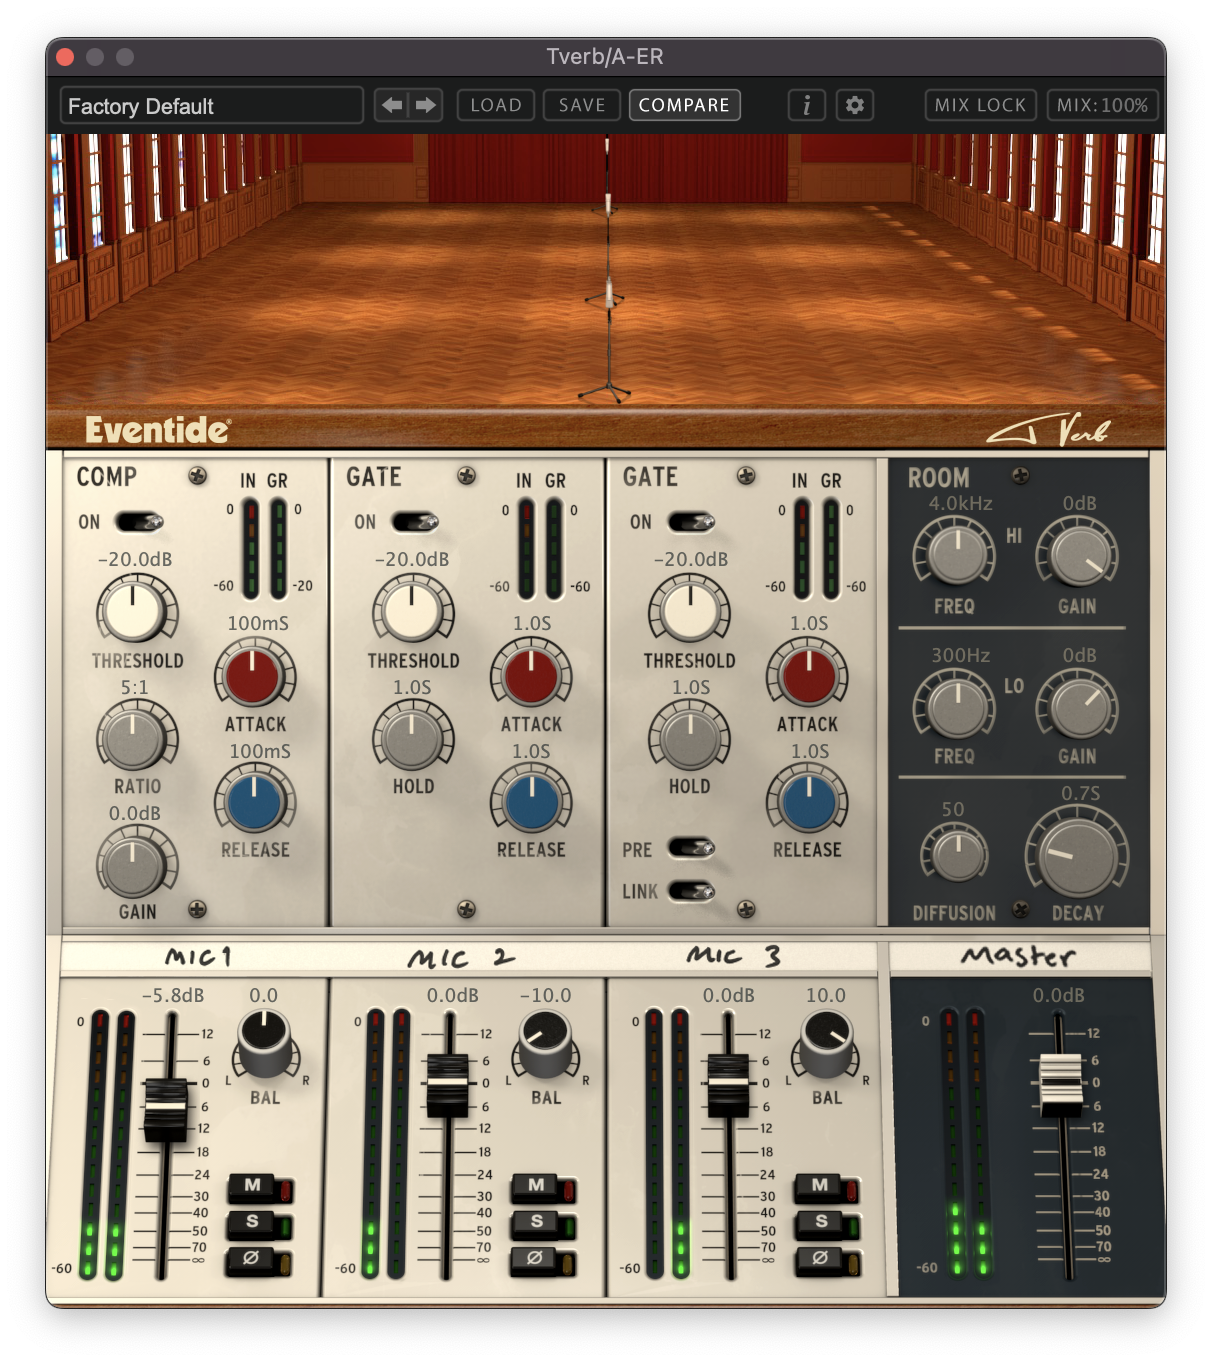
From here, we can start to experiment with the positioning of Mics one and two. Moving a microphone further away from the source sound will mean the signal arrives at it later, creating a kind of Haas effect of its own. Additionally, changing the position of a microphone proportional to each of the four walls of the hall will alter the recordings’ tone and reflections. Once you’ve established a configuration that works for your audio, it’s important to check the mono compatibility of your aux or return channel. If there is phase cancellation occuring, try inverting the phase on one or more of the Mic channels to see if that remedies the issue.

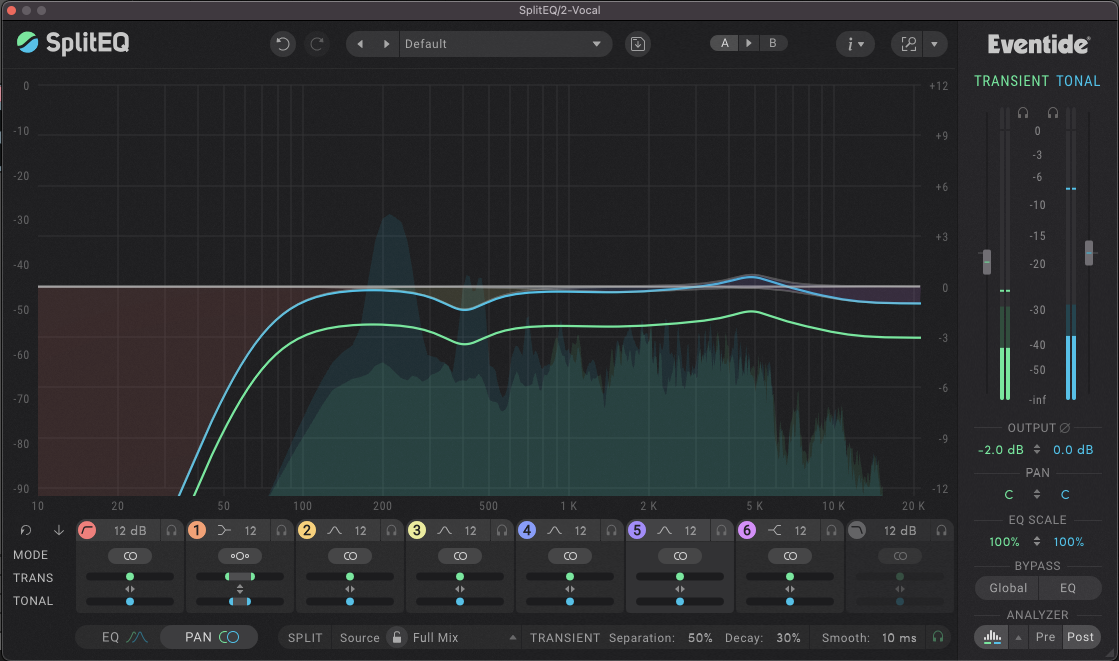
3. Panning Transient and Tonal in SplitEQ
Now, from an old recording setup to a new processing technique. Eventide’s Structural Split™ technology grants us a completely unique level of control over audio, giving us the power to independently process the transient and tonal portions of our signal. This has a near-endless list of potential applications, but in this article we’ll just take a look at how it can help us to add stereo width to a mono sound.
We’ve got a vocal here that was recorded in mono with a single microphone, and we’re going to use SplitEQ to give it a touch of stereo interest. One benefit of approaching the technique in this way is that we can also use SplitEQ to apply any necessary EQing as we go, along with the stereo processing, all within a single plug-in.
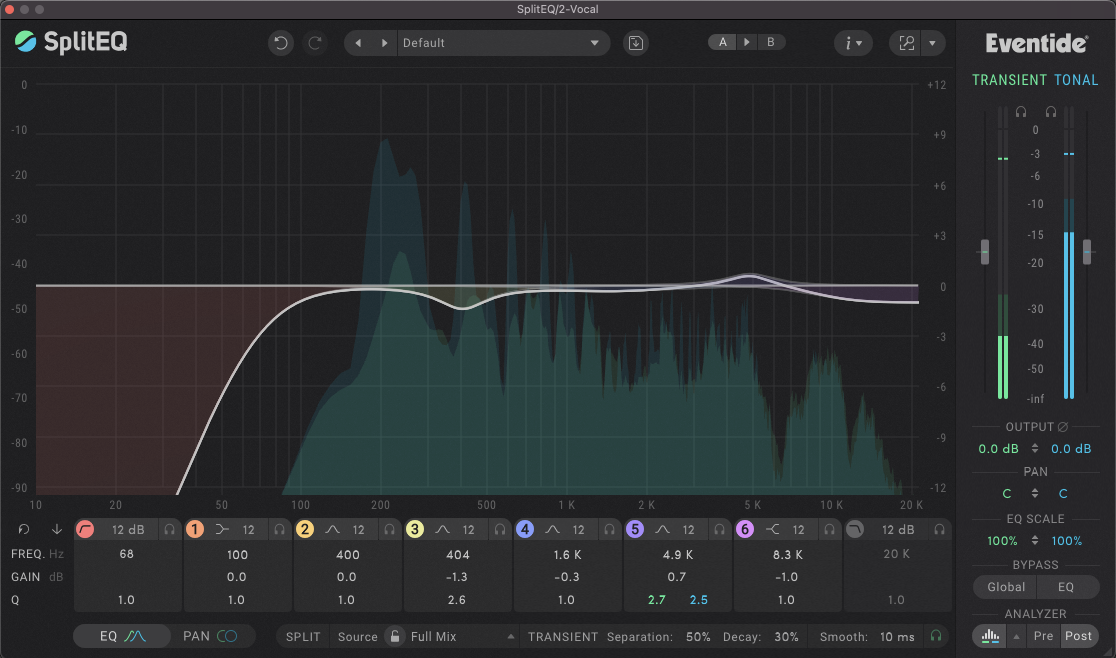
While we’re here, we’re also going to slightly tame some of the vocal’s sibilance and lip smacks by reducing the overall level of the transients with the Master Transient Gain.
Now onto the crux of this technique, which harnesses SplitEQ’s Pan mode to alter the panning of the Transient and Tonal portions of the signal across independent frequency bands. By slightly altering the panning of some of the bands on an alternating basis, we can achieve some really unique stereo effects. By applying more extreme panning as we get further up to the frequency spectrum, the high end will sound wider, leaving the low end in the center of the stereo field.
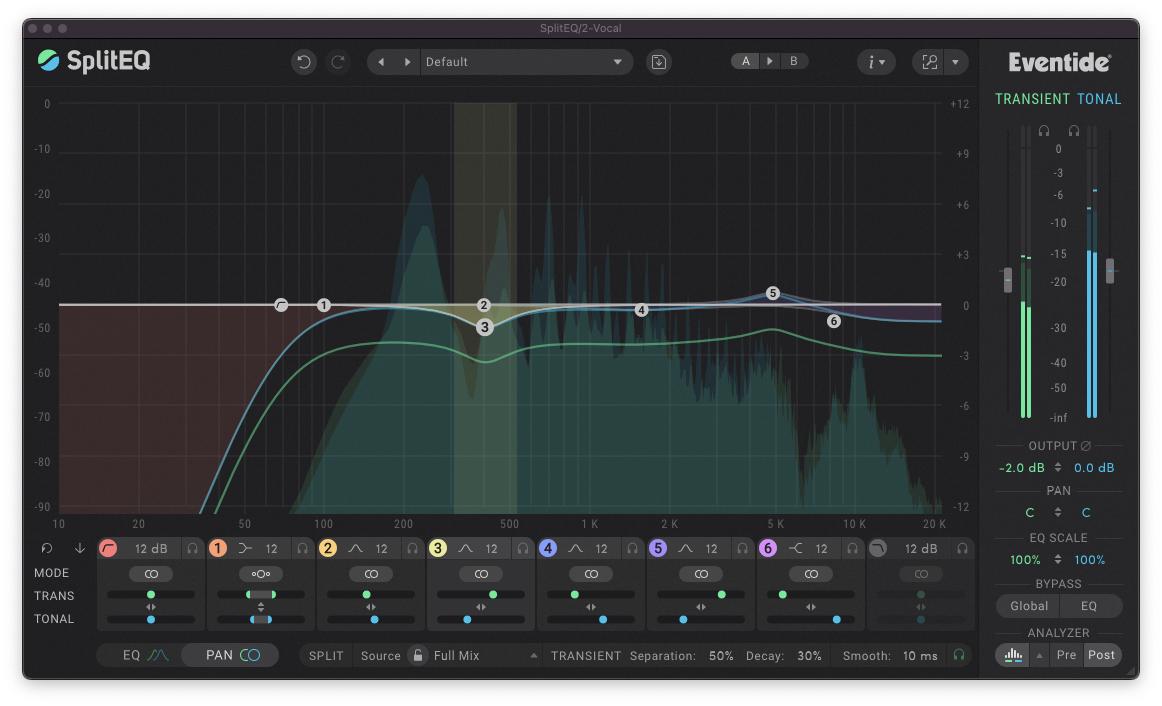
In order to further preserve the mono compatibility of the signal, we can place band one in Mid/Side mode as opposed to the default Pan mode. We can then reduce the level of the sides of the signal, keeping that frequency range closer to the middle of the signal.
4. Micro Pitch Shifting with UltraChannel
There’s very little UltraChannel can’t do when it comes to signal processing, hence the name. In the bottom left of the plug-in window, is the Micro Pitch Shift section. With only four controls, this technique is one of the quickest and simplest in this article. Punch the effect in using the In/Out button, and you’ll notice some gentle stereo pitch modulation which applies a chorus-like effect to your mono signal.
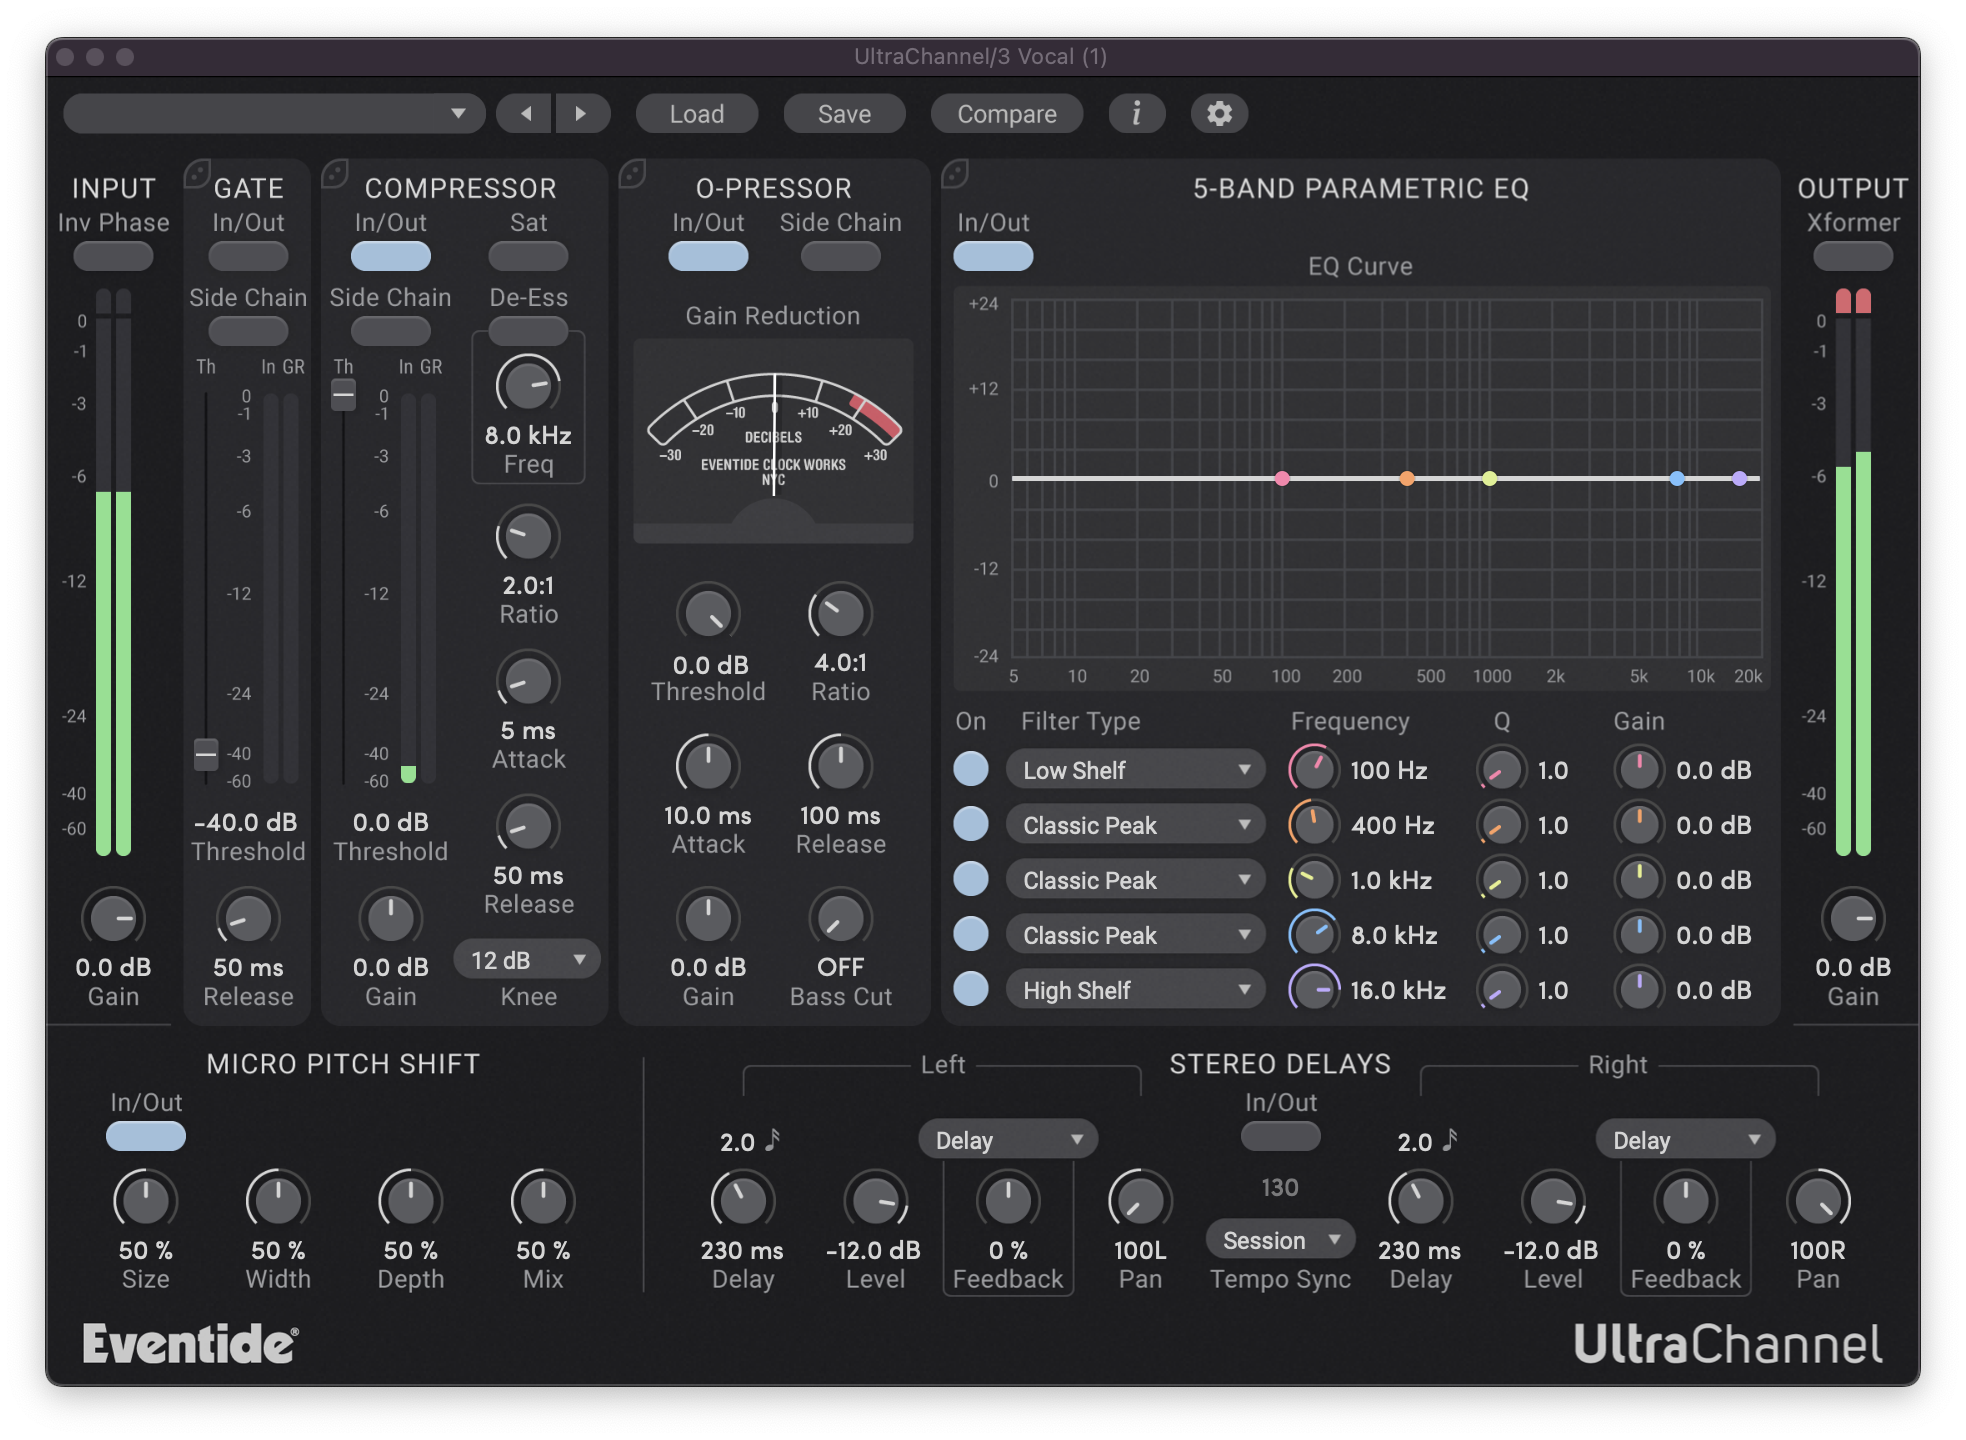
Depending on the desired result, the default settings might be a bit extreme for your tastes. In which case you can dial back the settings to work with your source material. The Width and Mix controls should be pretty self explanatory. Size refers to the amount of pitch shift that’s applied to each voice, and the Depth control scales the total spread of delay in the signal.
As with the previous technique, using a plug-in like UltraChannel lets you apply other processes to the signal all under one roof. UltraChannel is truly an audio one-stop-shop, boasting three advanced dynamics processing modules with sidechain functionality, Parametric EQ, Stereo Delays and of course, Micro Pitch Shift.
5. Hard Panning Different Reverbs
You might be familiar with the classic trick of applying a stereo reverb to a mono signal, in fact we even looked at an advanced version of this earlier on in the article. We’re going to take that a step further by applying two hard-panned reverbs to a signal. You can either use the same reverb with different settings, or two entirely different reverbs with similar settings. Here, we’ve opted for the latter.
Duplicate the element you want to widen, and pan them both in opposite directions. In our case, we’re utilizing this technique on a mono shaker track that we want to spread out a little. On the left channel, we’ve applied the SP2016 reverb, a plug-in version of our very own hardware SP2016 from the early 80s. On the right, Spring gives us a completely different character and tone from the SP2016. As with all of the stereo widening tactics explored above, the aim here is to create sonic differences in the left and right channels that the listener will then perceive as having width.
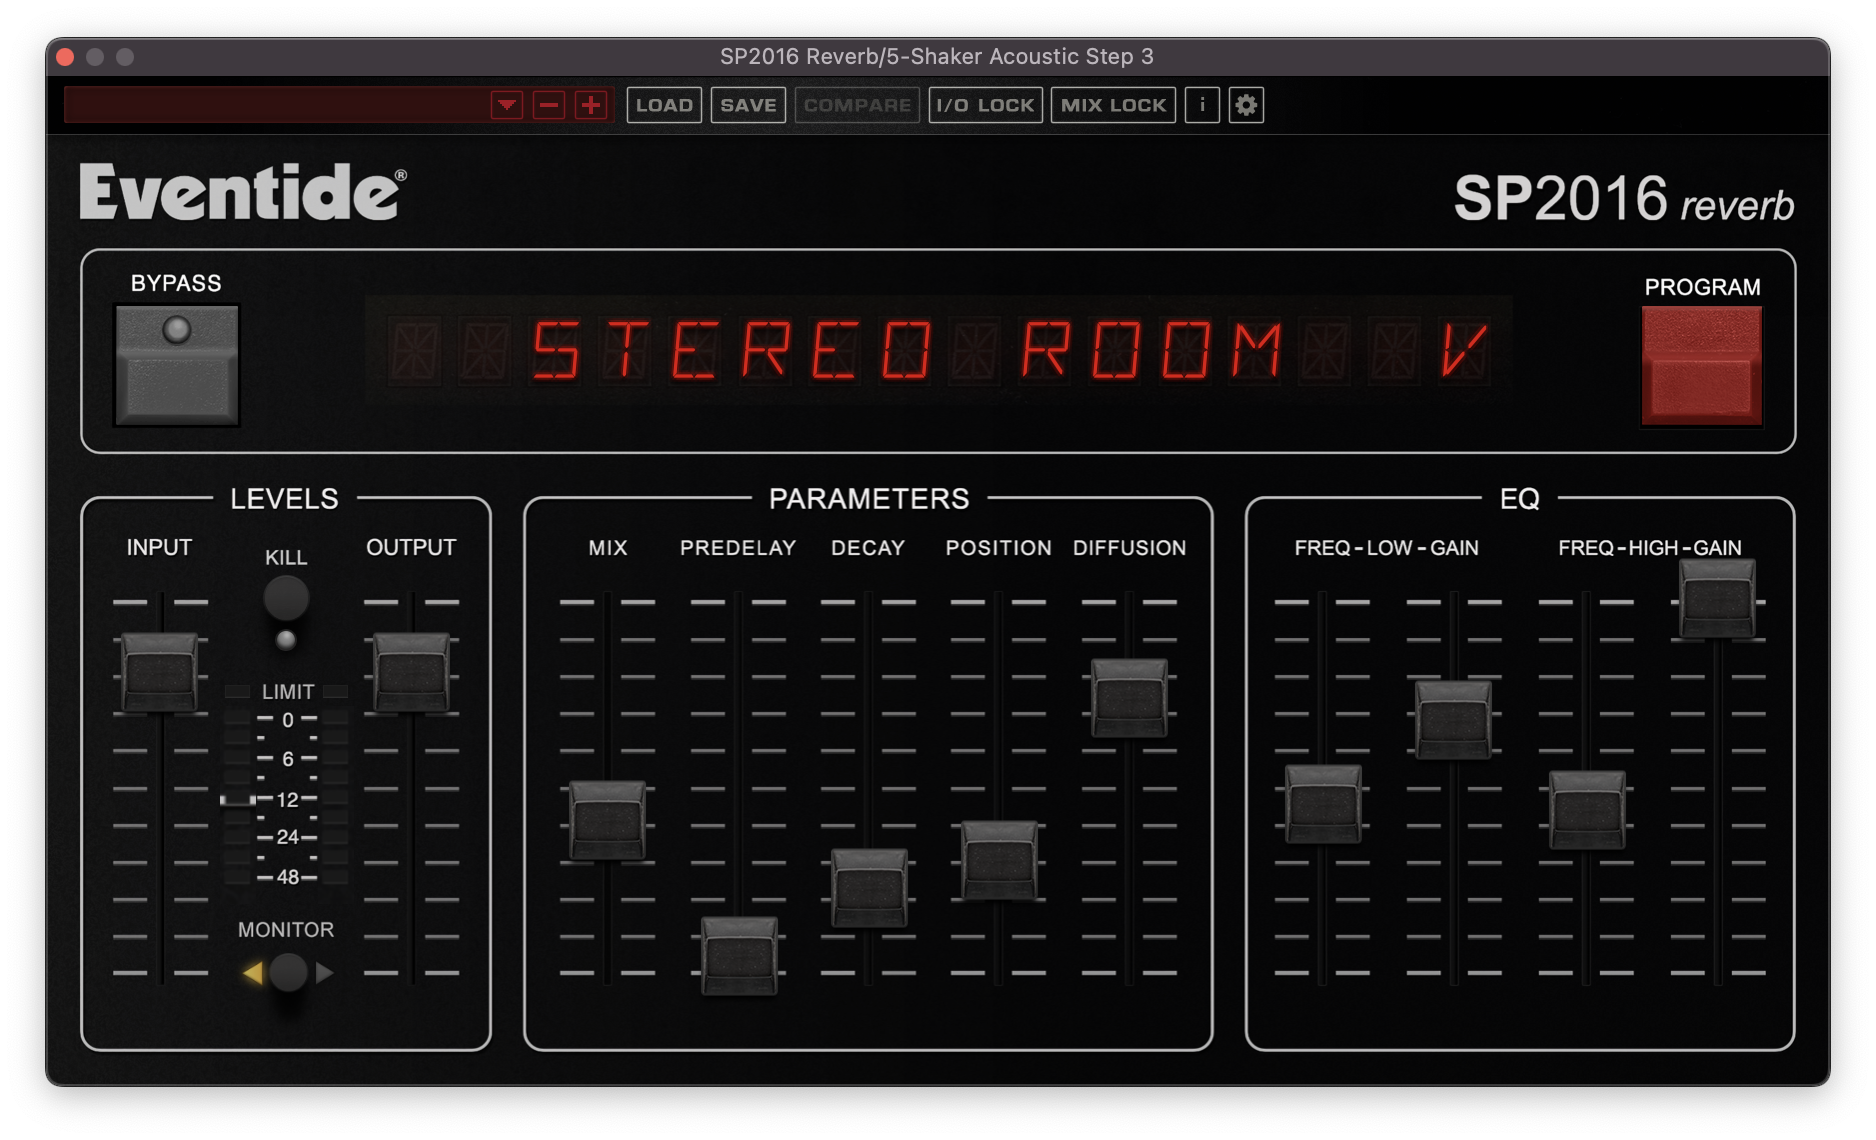
We just want to add a little bit of space and width to our shaker, so we’ve brought both reverbs’ decay times down to around one second, and the Mix levels to around 30%, but of course there’s no hard and fast rule here and you should experiment with what works within your mix.
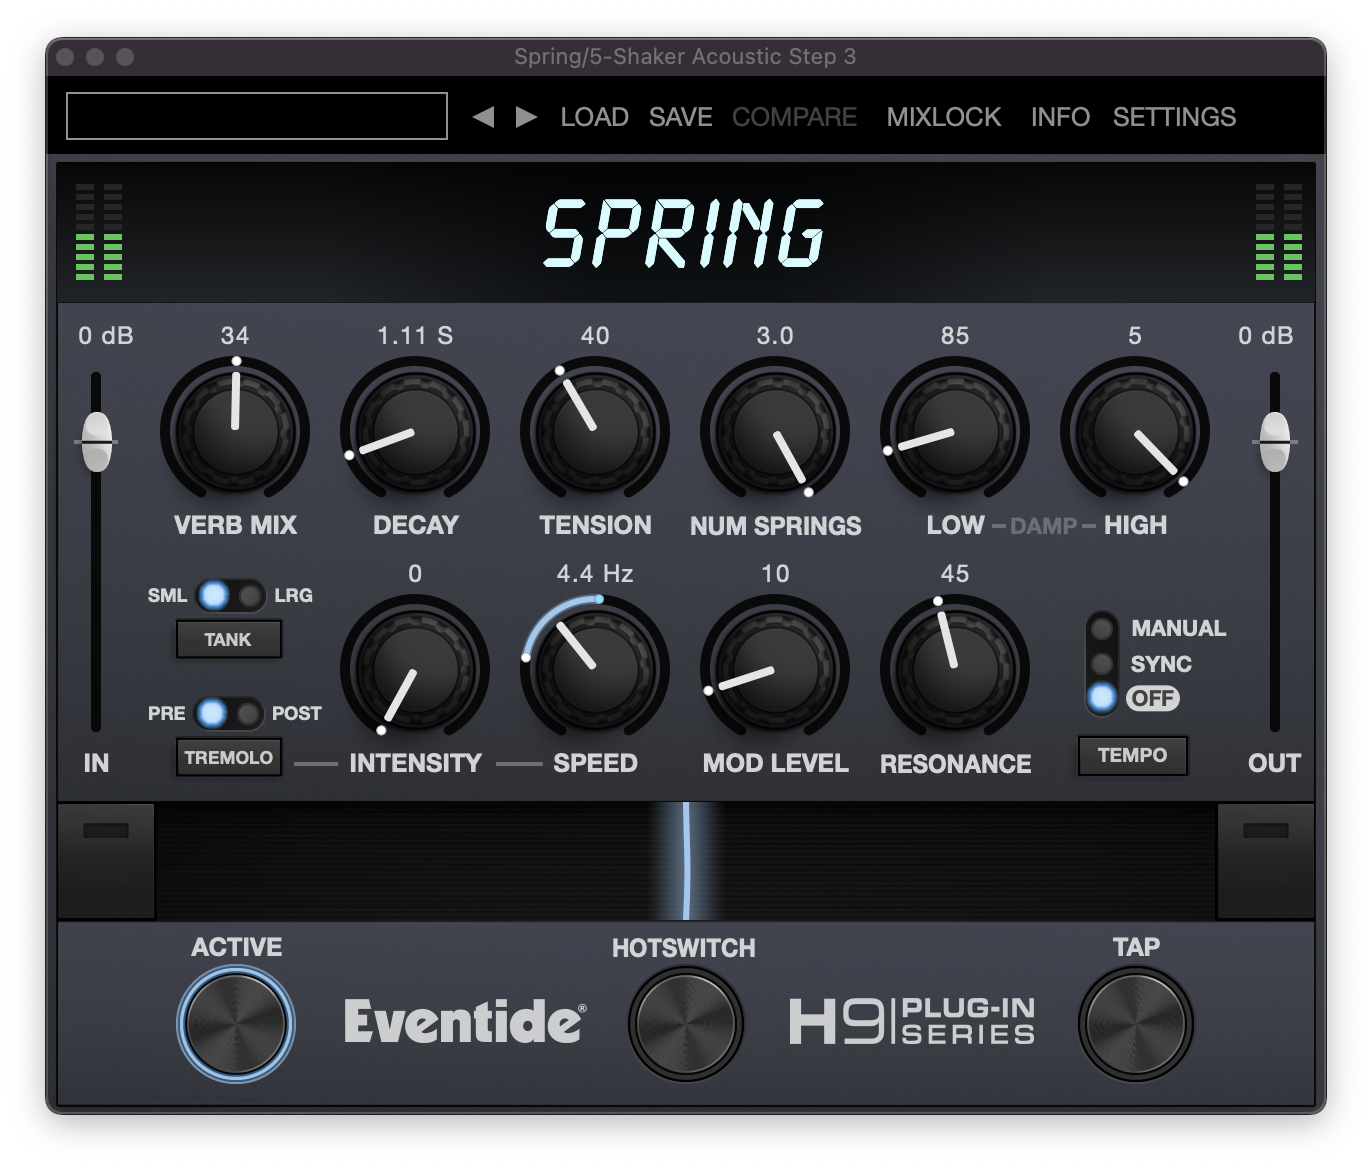
You can create further contrast between the left and right channels by adjusting some of the other parameters within your reverb. Try setting the low and high EQ or Damping to different settings on each reverb, and see if the tonal contrast helps to set the left and right channels further apart from one another. Once you’ve honed in on a sound you like, you can mix each channels’ levels and panning to taste.
You can find out more about the Eventide reverbs mentioned in this article, along with the rest of our suite of powerful plug-ins.


